Code
Below you find all posts tagged with "Code". You can always go back to the home page if you want to read more.

Below you find all posts tagged with "Code". You can always go back to the home page if you want to read more.
Wie im letzten Absatz meines Artikels zum DIY WiFi Environment Sensor erwähnt, war eines meiner Ziele herauszufinden, ob es sich lohnt zu lüften oder nicht. Um das zu erreichen, habe ich mir mittlerweile eine einfache App geschrieben, die mir genau das sagt. So konnte ich auch endlich mal etwas "sinnvolles" coden, um mich ein bisschen in Swift einzuarbeiten.
Die App liest beim Starten die Temperatur und relative Luftfeuchtigkeit meines Sensors drinnen (besagter WiFi Environment Sensor) und meines Sensors draußen (ein Elgato Eve Degree) aus. Diese Werte werden dann wie nachfolgend beschrieben verglichen, um zu einer Lüftungsempfehlung zu kommen. Lüftungsempfehlung heißt dabei, dass man die Luftfeuchtigkeit drinnen durch öffnen des Fensters senken kann. Eine einfacher Vergleich der relativen Luftfeuchtigkeit reicht hier natürlich nicht aus, da diese von der jeweiligen Temperatur abhängig ist.
Zuerst wird der Sättigungsdampfdruck in hPa mit Hilfe der Magnus-Formel für drinnen und draußen berechnet:
indoorSaturationVaporPressure = 6.112 * exp((17.62 * indoorTemperatureInC) / (243.12 + indoorTemperatureInC))
outdoorSaturationVaporPressure = 6.112 * exp((17.62 * outdoorTemperatureInC) / (243.12 + outdoorTemperatureInC))
Als nächstes wird der eigentliche Dampfdruck auf Basis der aktuellen Luftfeuchtigkeit ermittelt:
indoorVaporPressure = indoorSaturationVaporPressure / 100 * indoorHumidity
outdoorVaporPressure = outdoorSaturationVaporPressure / 100 * outdoorHumidity
Mit dem eigentlichen Dampfdruck kann nun der Wasserdampfgehalt, also die absolute Menge von Feuchtigkeit in der Luft in g/m³, errechnet werden:
indoorVaporAmount = (indoorVaporPressure / (461.5 * (273.15 + indoorTemperatureInC))) * 100000
outdoorVaporAmount = (outdoorVaporPressure / (461.5 * (273.15 + indoorTemperatureInC))) * 100000
Der Wasserdampfgehalt drinnen und draußen lässt sich abschließend wie folgt als Abweichung in Prozent in Relation setzen:
differenceVaporAmountInPercent = indoorVaporAmount * 100 / outdoorVaporAmount - 100Meine App empfiehlt eine Lüftung, wenn der Unterschied mehr als 10% beträgt, denn nur dann lohnt es sich wirklich und sieht im Ergebnis wie folgt aus.
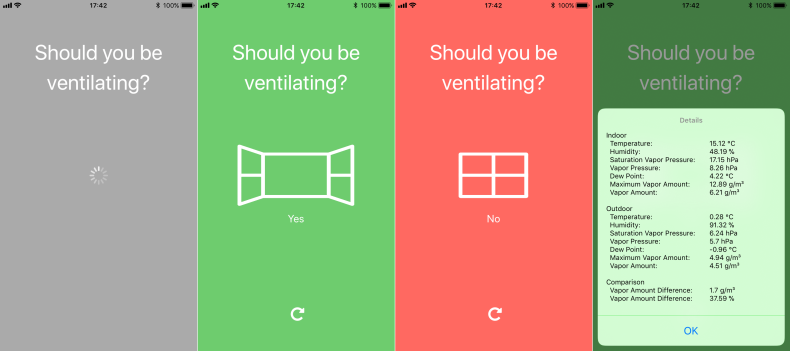
Neben der reduzierten Anzeige, ob sich das Lüften lohnt, lassen sich in der App mit einem einfachen Tap auch noch diverse Details abrufen, z.B die oben angesprochenen Werte oder der Taupunkt.
Wenn eine solche App nicht nur für mich interessant ist, lasst es mich wissen. Um den Code zu veröffentlichen, müsste ich den noch aufräumen und die Sensoren, die vergleichen werden sollen, konfigurierbar machen. Aktuell sind die Sensoren für mein spezielles Setup direkt im Quellcode hinterlegt.
Es gibt einige Räume im Haus, deren Temperatur und Luftfeuchtigkeit ich gerne überwachen möchte. Im Wohnzimmer habe ich dazu ein Elgato Eve Room stehen aber das für viele Räume anzuschaffen ist mir erstens zu teuer und zweitens komme ich mit Bluetooth LE nicht durch die Decken. Mehrere HomeKit-Hubs aufzustellen (bspw. AppleTV) ist irgendwie auch keine Lösung und Elgato kommt leider auch nicht mit einem angekündigten Bluetooth Range Extender um die Ecke (angeblich da Apple das nicht freigibt) aber das wäre ingesamt vermutlich auch unbezahlbar.
Was bleibt? DIY! Lötkolben raus, IDE auf und einen Sensor Marke Eigenbau selber basteln.
Die Hardware
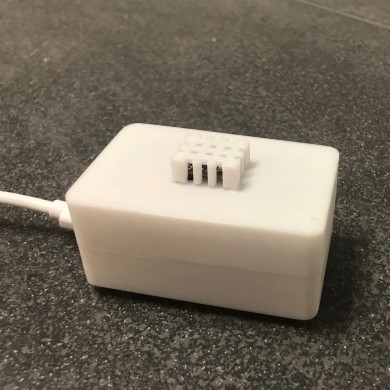
Nach ein bisschen Recherche bin ich als Sensor auf den Bosch BME280 gestoßen, der Temperatur, Luftfeuchtigkeit und Luftdruck messen kann. Den Sensor gibt es bspw. bei AliExpress für um die 3 € auf einem Breakout Board.
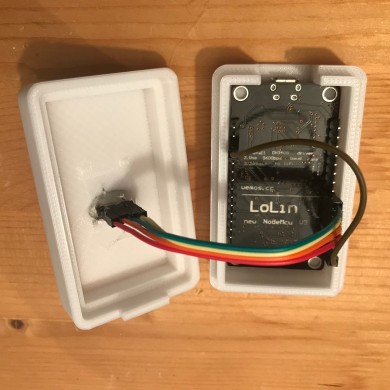
Da die Sensordaten natürlich auch irgendwie per HomeKit verfügbar sein sollen, gab es dazu noch ein NodeMCU, ebenfalls von AliExpress für ca. 2,50 €. NodeMCU ist ein Entwicklungsboard, das einen ESP8266 Chip zur Verfügung stellt und damit WiFi / WLAN Applikationen sehr einfach zu bauen und zu programmieren macht.
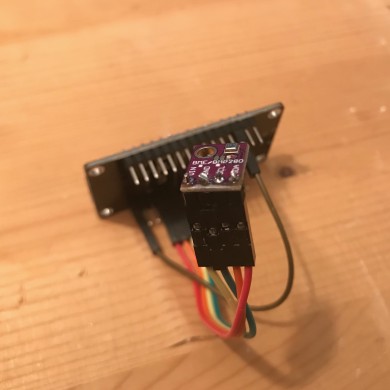
Nach dem Anlöten von vier Pins an das BME280 Breakout Board kann man die beiden Hardwarekomponenten einfach nach folgendem Muster mit Jumper-Kabeln verbinden:
NodeMCU | BME280
3V      | VIN
G       | GND
D3      | SCL
D4      | SDA
Zusätzlich habe ich noch den D8 Pin des NodeMCU mit RST Pin des NodeMCU verbunden, um die Deep Sleep Funktionalität des Boards zu nutzen. Die Idee ist hier, dass das Board nicht permanent läuft und Strom konsumiert, sondern nach einer Messung für einen definierten Zeitraum einschläft und danach eine neue Messung startet. Durch die so erzielte Stromeinsparung könnte man den Sensor später auch mit einer Batterie betreiben aber das habe ich in diesem Projekt nicht umgesetzt.
Die Software
Bei der Software gibt es drei Komponenten, die ich nachfolgend beschreibe. Zum einen die Firmware für den ESP8266 Chip, dann einen Webservice zum speichern und verwalten der Sensordaten und zu guter letzt ein Plugin für Homebridge, um den Sensor in HomeKit verfügbar zu machen. Den Sourcecode für alle drei Komponenten findet ihr in einem GitHub Repository.
Firmware
Die Firmware für den ESP8266 Chip habe ich mit der Arduino IDE entwickelt. Dazu braucht es neben der IDE selbst noch den ESP8266 Arduino Core, der die Unterstützung des Chips bereitstellt. Zusätzlich gibt es auch Bibliotheken, um mit dem BME280 Sensor zu kommunizieren. Hierbei habe ich mich für den Adafruit Unified Sensor Driver und die Adafruit BME280 Library entschieden. Wie man die einzelnen Bibliotheken einbindet ist auf den jeweiligen Projektseiten gut beschrieben.
Für mein Board musste ich die I2C Adresse des BME280 noch anpassen. Die Adafruit Breakout Boards nutzen hier wohl standardmäßig die Adresse 0x77, meine Boards aus dem Reich der Mitte nutzen aber die Adresse 0x76. Das lässt sich aber einfach im Header-File Adafruit_BME280.h der Adafruit BME280 Library anpassen, indem man dort nach der Zeile #define BME280_ADDRESS (0x77) sucht und entsprechend anpasst (sofern nötig).
Um das Board per USB anzusprechen und die Firmware drauf zu laden, braucht es noch einen USB to Serial Driver. Bei mir unter macOS hat dieser Treiber sich als funktionierend herausgestellt, wie es auf anderen Betriebssystemen aussieht kann ich leider nicht sagen.
Damit ist alles vorbereitet und es kann an die Programmierung der ESP8266 Firmware gehen. Der komplette Sourcecode findet sich auf GitHub, ich möchte aber noch mal kurz auf den Ablauf eingehen:
Wenn das NodeMCU Board Strom bekommt, wird die setup() Methode aufgerufen. Darin wird zuerst eine Verbindung zum WiFi aufgebaut, die SSID sowie das Passwort sind dabei konfigurierbar. Als nächstes wird die Verfügbarkeit des BME280 geprüft und der Sensor mit einigen Parametern initialisiert. Man muss diese Konfiguration nicht zwingend vornehmen, da der Sensor auch ohne misst, für meinen Anwendungsfall haben sich aber die im Code hinterlegten Sampling-Raten als die zuverlässigsten und genauesten herausgestellt. Nachdem im nächsten Schritt eine Messung von Temperatur (t), Luftfeuchtigkeit (h) und Luftdruck (p) vorgenommen wird, werden die ermittelten Werte an den Webservice (siehe unten) geschickt. Zu guter Letzt wird das Board in den Tiefschlaf versetzt und wacht dann nach der festgelegten Zeit wieder auf und das Ganze beginnt von vorne.
Webservice
Die ermittelten Sensordaten der schönen neuen Hardware müssen natürlich auch irgendwo hin. Insbesondere, da ich mich dafür entschieden habe die Hardware nicht permanent Strom ziehen zu lassen sondern zwischendurch in den Tiefschlaf zu versetzen, braucht es natürlich eine Persistenzschicht. Darüber hinaus möchte ich später auch gerne eine Historie der Sensordaten abrufen können.
Um das zu realisieren, habe ich einen kleinen Webservice in Node.js geschrieben, der die Sensordaten entgegennimmt und in einer SQLite Datenbank speichert. In meinem Szenario läuft der Webservice auf einem Raspberry Pi, der auch schon meine bestehende Hombridge Installation beherbergt. Der Webservice stellt dabei REST Endpunkte zum Hinzufügen, Lesen und Löschen von Sensordaten zur Verfügung. Der komplette Sourcecode sowie eine API Beschreibung findet sich im entsprechenden GitHub Repository.
Homebridge Plugin
Um die Sensordaten in HomeKit verfügbar zu machen fehlt noch ein Plugin für Homebridge. Homebridge emuliert die HomeKit API und kann damit auch Geräte wie diesen Sensor mit entsprechender Funktionalität ausstatten und so bspw. auch über Siri steuerbar machen. Details zu Homebridge und zur Installation gibt es an anderer Stelle genug, ich gehe hier also nur auf das selbstgeschriebene Plugin ein.
Was das Plugin im Endeffekt macht, ist HomeKit ein neues Accessory zur Verfügung zu stellen, das die Services bzw. Charakteristiken Temperatur (Temperature) und Luftfeuchtigkeit (Humidity) anbietet. Da Luftdruck (Air Pressure) leider noch keine offizielle HomeKit Charakteristik ist, fällt der Wert leider erstmal unter den Tisch. Die Werte werden vom Plugin dann per GET Request vom Webservice (siehe oben) abgeholt und können in HomeKit Apps angezeigt oder per Siri abgefragt werden.
Derzeit wird nur der aktuellste Sensorwert ausgegeben, die Eve App von Elgato kann aber bspw. auch historische Daten anzeigen und das ist eine meiner nächsten Verbesserungsideen. Mit fakegato-history gibt es bereits ein Projekt, welches die Daten vermutlich entsprechend aufbereiten könnte. Teile des Projektes basieren dabei auch auf meinen Reverse Engineering Aktivitäten in dem Umfeld.
Das Gehäuse
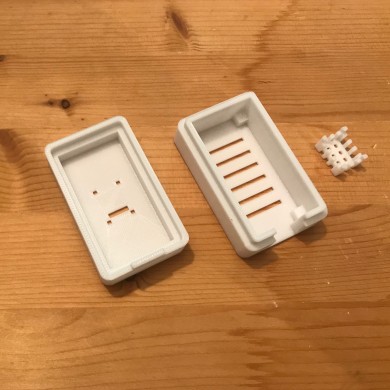
Es hat zwar auch einen gewissen Charme, wenn überall im Haus Platinen zu sehen sind, die Meinung teilt aber nicht jede(r). Zum Glück gibt es ja freundliche Kollegen, die einen 3D-Drucker besitzen und sich bereit erklären ein Gehäuse zu drucken. Nachdem ich mit Onshape also ein entsprechendes CAD-Model designed und verschickt hatte, konnte ich den Sensor bereits am nächsten Tag in ein schickes Gehäuse stecken. Danke, Manuel!
Wenn ich weitere Sensoren dieser Art baue, werde ich das CAD Model wohl noch mal überarbeiten, da es an einigen Ecken ein bisschen knapp bemessen war. Gepasst hat es aber auch so irgendwie.
Das Ergebnis
Wenn man die Arbeitszeit (Basteln, coden, CAD Model bauen, etc.) mal aussen vor lässt, habe ich mir mit diesem Projekt für ein paar wenige Euro einen sehr gut funktionierenden Raumklima-Sensor gebaut. Ein freundliches "Hey Siri, wie ist die Luftfeuchtigkeit im Keller?" sagt mir damit ab sofort, ob ich dort besser mal lüften sollte. In Kombination mit einem Außensensor lässt sich damit natürlich auch herausfinden, ob das wirklich sinnvoll ist oder ob es draußen so feucht ist, dass das Lüften eher kontraproduktiv wäre.
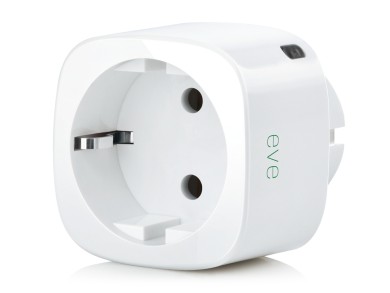
I got myself an Elgato Eve Energy power sensor and switch to get a feeling for HomeKit in general and how I can make use of it.
The hardware itself looks clean and stylish and the installation is a breeze: You simply plug it in, fire up the Eve app and pair it. After about a minute of setting things up I was able to switch the outlet on and off and get statistics about the current power consumption in W and total power consumption in kWh.
After another minute of playing around I was also able to talk to the outlet using Siri, how cool is that? Asking Siri "Is the living room outlet turned on?" resulted in her answer "Your outlet is turned on", telling her “Turn off the oulet in the laundry room” switched the outlet off. Awesome.
Talking to my outlets and getting statistics is nice and all but what I really want is setting up triggers and do stuff depending on each other like sending notifications once the washing machine is done. I knew that the whole HomeKit framework is not yet where I want it to be (e.g. apps working with your accessories need to be running in the foreground) and the Eve accessories aren’t there es well (e.g. no triggers) but as already said, first of all I want to get a feeling for it.
To dive in deeper I fired up Xcode and played around with the HomeKit API, looking at what the outlet exposes to see where it takes me… Oh my, what a letdown! HomeKit has the concept of characteristics that tell you about the different aspects of an accessory. This is supposed to be standardized so all HomeKit apps can communicate with all kind of HomeKit hardware but Elgato does not seem to be interested in playing along: Yes, the characteristics are available but there is not the slightest bit of information about what the individual characteristics are representing and neither about their format.
Asking the Elgato support about a documentation of characteristics resulted in a short "Nope, documentation is not available". Thank you!
After being annoyed for a couple of hours I decided doing some reverse engineering to see what characteristics Eve Energy exposes and to make some sense of it. To do that I tried several test scenarios and dumped the value of all characteristics as well as the output of the Eve app in these.
Now it was simply a task of comparing characteristics, guessing formats and some calculations. To cut a long story short I summarized what I learned about Eve Energy in a Gist on GitHub. I haven’t made sense of everything up to now but it should be a good start. I try updating the Gist as I learn more and am open for comments and additions.
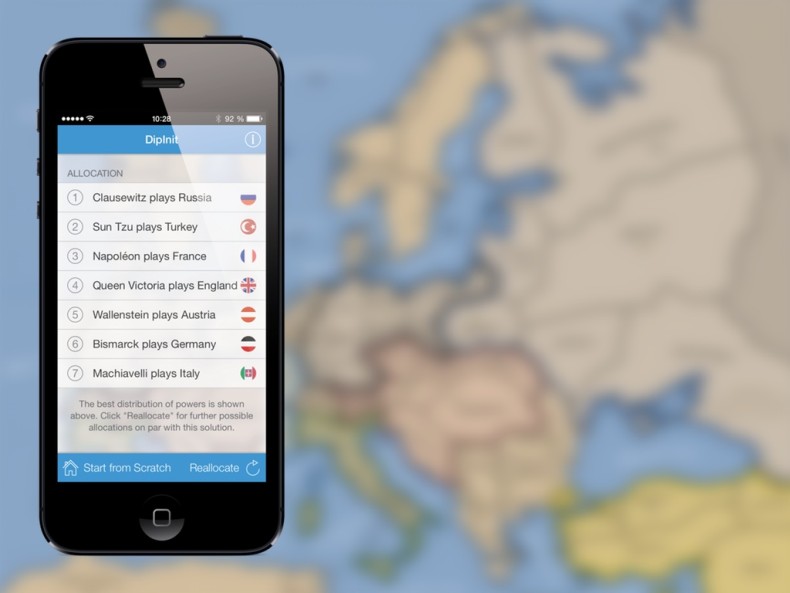
DipInit Mobile is the solution for the rare occasions where you don't have your Mac with you but still need to allocate powers for a game of Diplomacy. It is a web application running in a browser, allowing you to do exactly what you already know from the desktop version of DipInit: Allocating countries for a game of Diplomacy based on the players' priorities.
To use DipInit Mobile, open it in your favorite browser and prioritize away. The web app was designed to work on mobile phones and was successfully tested on iPhone 5+ and large screen Android devices. For even quicker access, add DipInit to your smartphone's home screen.
node-mailchimp has finally been updated to version 0.8.2 with some long overdue bugfixes and is available via npm and GitHub. Good things come to those who wait.
In addition to the bugfixes I added support for the Mandrill API which should be working fine but was not properly tested up to now. I would not mind if you play around with it. Mandrill is a new product from the MailChimp team that provides email as a service running on the MailChimp infrastructure. Mandrill support in node-mailchimp is not yet available via npm but only directly from the GitHub repository.
If you want to give it a try, have a look at the following example. Further information can be found on the GitHub project page.
First of all you need an instance of the Mandrill API wrapper:
var MandrillAPI = require('mailchimp').MandrillAPI;

try {
    var mandrill = new MandrillAPI('Your API Key');
} catch (error) {
    console.log('Error: ' + error);
}
With the wrapper instantiated you can now use all methods described in the Mandrill API documentation. The method names in this wrapper reflect the method names of the API and are named category_method with dashes (-) in method names being replaced by underscores (_).
The API method send-template from the API category messages would thus be available as messages_send_template in this wrapper. The parameters of the methods are passed as an object, omitting the API key which was already set earlier.
var params = {
	template_name: 'Name of the template to send',
	template_content: 'An array of template content to send',
	message: 'Information on the message to send'
};

mandrill.messages_send_template(params, function (data) {
    if (data.error)
        console.log('Error: '+data.error+' ('+data.code+')');
    else
        console.log(data); // Do something with your data!
});
A second way to use the Mandrill API is by using the call method instead of the wrapped methods directly. The call method differentiates between the categories and methods of the Mandrill API more clearly and automatically converts dashes to underscores. The example above using the call method looks like the this:
var params = {
	template_name: 'Name of the template to send',
	template_content: 'An array of template content to send',
	message: 'Information on the message to send'
};

mandrill.call('messages', 'send-template', params, function (data) {
    if (data.error)
        console.log('Error: '+data.error+' ('+data.code+')');
    else
        console.log(data); // Do something with your data!
});
Any feedback on the Mandrill functionality as well as node-mailchimp in general is much appreciated. Just contact me via the GitHub project page or Twitter.
Officially announced at JSConf EU 2011, but used for almost a year and half prior by the community, we are just going to offer this logo for use with JS projects. If you like it use it, if you don’t that’s cool too. Just don’t complain unless you want to offer a different one, post your alternative to twitter with the tag #jslogo. We are releasing this under a WTFPL license so you can print it on anything, use it anywhere, and never have to worry about royalties, licenses, and other such things.
This is a gift from JSConf to you, with love!
Enjoy.
The latest version of node-mailchimp is now available from npm and GitHub. Be sure to update to have fun with the brand new OAuth2 functionality. Yay!
Below you find a rundown on how the OAuth2 process is handled by node-mailchimp along with an example on how to use it.
First of all you have to require and instantiate the module with a couple of parameters. The parameters clientId and clientSecret are required parameters available from MailChimp, a detailed explanation on how to get these can be found in the MailChimp OAuth2 documentation.
var MailChimpOAuth = require('mailchimp').MailChimpOAuth;

var options = {
    clientId: 'Your MailChimp client id',
    clientSecret: 'Your MailChimp client secret',
    serverUri: 'http://www.example.com',
    redirectUri: 'http://www.example.com/successfulLogin.html'
};

var oauth = new MailChimpOAuth(options);
When instantiating the module a server is automatically set up that listens on HTTP requests from MailChimp. This server needs to be available from the internet at the URI specified by serverUri, more on that later.
We're using OAuth2 as we want the user to allow access to MailChimp without giving his credentials to us so we need to send him to the MailChimp server to authorize there. Using the following method of MailChimpOAuth we receive a special URI to the MailChimp login form the user needs to be redirected to in a browser.
oauth.getAuthorizeUri();That URI also includes the serverUri specified as a parameter and exactly that’s the URI the user will be redirected to upon successful authorization. The answer from MailChimp to that URI includes a code we need later on. If you additionally specified the parameter redirectUri the user is redirected to that page in the browser so he doesn't see a blank page.
The code received is now used to request an access token from MailChimp which in turn is used to get some additional metadata for our connection. All of that happens automagically, though, you don't have to do anything except listening for an authed event issued by MailChimpOAuth once everything is finished.
oauth.on('authed', function (apiKey) {
});
As you can see the event receives the parameter apiKey which you can pass on to other API functionality. That API key isn't really an API key to be quite honest, MailChimp is treating the access token similar to an API key, as explained in their API docs, though.
That's it! Having the API key you can now do whatever you want with the API, for example reading a list of the last 25 campaigns like follows.
var MailChimpAPI = require('mailchimp').MailChimpAPI;

oauth.on('authed', function (apiKey) {

    try {
        var api = new MailChimpAPI(apiKey, { version : '1.3', secure : false });
    } catch (error) {
        console.log('Error: ' + error);
    }

    api.campaigns({ start: 0, limit: 25 }, function (data) {
        if (data.error)
            console.log('Error: '+data.error+' ('+data.code+')');
        else
            console.log(JSON.stringify(data)); // Do something with your data!
    });

});
One more thing: It makes sense listening on the error event of MailChimpOAuth as well so you're hopefully able to tell what went wrong, if something goes wrong.
oauth.on('error', function (message) {
    console.log('Error: '+message);
});
Any feedback is much appreciated as version 1.0 is getting closer and I want a solid wrapper by then that not only implements all functionality available in the MailChimp API (it does that already) but is also a breeze to work with.
Trying to enhance node-exif, my Exif library for node.js, I came across Makernotes which really do annoy me right now.
Makernotes are part of the Exif specification, a standard for storing information about an image inside the image file, especially used in JPEGs. Where Exif itself is well specified and documented, the Makernote part is everything but. The specification describes the Makernote as "a tag for manufacturers of Exif writers to record any desired information. The contents are up to the manufacturer, but this tag should not be used for any other than its intended purpose".
As you can imagine the part the contents are up to the manufacturer led to a lot of different specifications with most of them being proprietary. Hurray! Luckily most of the specifications have been reverse engineered by now, for example by Evan Hunter, and are available around the internet, no one seems to claim completeness, though.
As if the proprietary nature with missing specifications isn't enough the Makernotes bring a couple of other problems which I’m not going to elaborate on here. If you’re interested you can check the Exiv2 Makernote page for a start.
Anyway, after digging for information and writing some code to extract the Makernote data I now need to test if everything works and iron out some bugs. This is why I'm looking for pictures taken with cameras by the following manufacturers and hope you can help me out:
Agfa, Asahi, Canon, Casio, Contax, Epson, Fujifilm, Foveon, Kodak, Konica, Kyocera, Leica, Mamiya, Minolta, Nikon, Olympus, Panasonic, Pentax, Ricoh, Samsung, Sigma, Sony.
If you own a camera by one of the manufacturers, know someone who does or simply have a picture taken with one of these cameras around I’d really appreciate if you can drop me a line and/or the picture on Twitter or GitHub. Thanks!